If you love Oreo cookies and creamy desserts, you're in for a treat with this Mini No-Bake Oreo Cheesecakes Recipe. These little vegan delights are as easy to make as they are delicious—no oven needed, just a freezer and some patience for that perfect chill.

Jump to:
Why You'll Love This Recipe
I absolutely adore these mini cheesecakes—they’re the ultimate party pleaser and a lifesaver when you want something sweet and fancy without the fuss of baking. Honestly, once I mastered this recipe, they became my go-to treat for gatherings or a cozy night in.
- Super simple to make: No baking means less stress and fewer dishes to wash!
- Vegan and dairy-free: Enjoy all the creamy goodness while sticking to a plant-based lifestyle.
- Perfect size: These mini cheesecakes are the ideal single-serving indulgence—no guilt, just pure yum.
- Crunchy & creamy combo: That Oreo base with velvety cheesecake filling is a match made in dessert heaven.
Ingredients & Why They Work
For this recipe, you’ll want to have some trusty pantry staples on hand. Choosing quality dairy-free cream cheese and whipping cream is key—trust me, it makes all the difference in creating that smooth, luscious texture.

- Oreo Cookies: The iconic crunchy cookie base everyone loves, plus we fold some crushed Oreos into the filling and use more for garnish—so rich in flavor and texture.
- Dairy-free butter or margarine: Helps bind the Oreo crumbs into a perfectly firm base that won’t crumble when you bite in.
- Dairy-free whipping cream: This is what gives the filling its airy and creamy body—Elmlea Plant Based Alternative Double cream is my favorite for this.
- Dairy-free cream cheese: The heart of the cheesecake flavor! Brands like Violife Original or Sainsbury’s Free From Soft Cream Cheese work wonders and keep it vegan.
Make It Your Way
The beauty of this Mini No-Bake Oreo Cheesecakes Recipe is how easily it adapts to your taste and occasion. Feel free to get creative and add your personal twist to make these vegan treats truly yours!
- Chocolate Lovers’ Delight: I’ve tried folding in a handful of dairy-free mini chocolate chips into the cheesecake filling for an extra burst of chocolatey goodness—totally irresistible!
- Berry Bliss Variation: Swapping some chopped fresh strawberries or raspberries on top adds a refreshing contrast that brightens each bite and makes it perfect for summer gatherings.
- Nutty Twist: For added texture, sprinkle crushed toasted almonds or hazelnuts on top of the whipped cream—nuts add a lovely crunch that complements the creamy filling.
- Seasonal Spice: Around the holidays, try mixing a pinch of cinnamon or pumpkin spice into the cheesecake filling to give these mini cheesecakes a cozy, festive vibe.
- Allergy-Friendly Swap: If you prefer, substitute the Oreo cookies with a gluten-free or allergen-safe cookie alternative—just make sure they hold up well when pressed into the base.
Step-by-Step: How I Make Mini No-Bake Oreo Cheesecakes Recipe

Step 1: Crafting the Perfect Crunchy Base
Start by gently melting 50 g of dairy-free butter or margarine in a small saucepan over low heat. As soon as it’s fully melted, remove it from the heat to prevent burning. Meanwhile, blitz 150 g of Oreo cookies in a food processor until you have fine crumbs that look like sand. Pour these crumbs into the melted butter and stir thoroughly with a spoon or spatula—the mixture should feel like wet sand and should hold its shape when squeezed. Press this mix firmly into each section of your cookie cup tin using clean hands to ensure the base is compact and sturdy. This step is key to avoiding crumbles later. Once all bases are set, pop the tin into the freezer while you make the delicious filling.
Step 2: Whipping Up the Dreamy Cheesecake Filling
In a medium bowl, combine 260 g of dairy-free whipping cream and 160 g of dairy-free cream cheese. Using a mixer or hand whisk, whip first on low speed to avoid any splashing, then crank up to high and beat for about 5 minutes until the mixture is thick, creamy, and luscious. Next, finely blend 8 Oreo cookies and gently fold them into the whipped mixture, making sure each bite will have delightful cookie bits. Transfer this cheesecake filling into a piping bag fitted with a large round tip, or simply snip off the bag’s tip for easy filling.
Step 3: Filling the Cups and Setting Your Mini Masterpieces
Pipe the cheesecake filling evenly into each cookie base, filling the cups nicely. Use an offset spatula or the back of a spoon to level off the tops, making them smooth and inviting. Place the filled tins back into the freezer for 4 hours, or until the cheesecakes are fully firm to the touch. If you’re using push-up tins, gently push up the bases to release the cheesecakes cleanly—remember, if they’re not firm enough, they might break apart!
Step 4: Whipping the Perfect Topping and Decorating
Shortly before serving, whip 20 g of dairy-free whipping cream on high speed until thick and billowy. Transfer this into a piping bag fitted with an open star tip nozzle for that lovely decorative swirl. Pipe a swirl of cream on top of each cheesecake, then garnish with half an Oreo cookie and a sprinkle of cookie crumbles for that final wow factor. Serve chilled, and prepare for compliments!
Top Tip
Making these Mini No-Bake Oreo Cheesecakes Recipe truly shine is all about a few simple tricks I've picked up along the way. These tips will ensure your cheesecakes set perfectly, look gorgeous, and wow anyone lucky enough to try them!
- Compact the Base Well: I’ve learned that pressing the Oreo and butter base mixture firmly into the cookie cups makes all the difference. It prevents crumbling and helps your cheesecake hold its shape beautifully when unmolding.
- Whip Cream Gently at First: Starting the dairy-free whipping cream on low speed avoids splashing and mess. It also helps achieve that smooth, light texture that’s crucial for a creamy filling.
- Use a Piping Bag for Clean Assembly: Piping the filling and whipped cream topping gives your mini cheesecakes a polished, professional appearance without any fuss.
- Freeze Until Firm: One thing I always avoid is trying to unmold the cheesecakes before they’re fully frozen. If they’re not firm, they can lose shape or get sticky. Patience here really pays off!
How to Serve Mini No-Bake Oreo Cheesecakes Recipe

Garnishes
To make your mini cheesecakes pop visually and add extra flavor, try topping them with a swirl of dairy-free whipped cream, a half Oreo cookie, and a sprinkle of crushed Oreo crumbles. For a touch of color and freshness, add a few fresh berries like raspberries or blueberries alongside. A light dusting of cocoa powder or a drizzle of dairy-free chocolate sauce also pairs wonderfully with these vegan delights.
Side Dishes
These little treats are perfect on their own or alongside a hot cup of coffee or tea. For a party spread, serve with fresh fruit platters, vegan cookies, or even a scoop of dairy-free vanilla ice cream. Their rich and creamy texture makes them a satisfying finish to any casual or festive meal.
Make Ahead and Storage
Storing Leftovers
To keep your Mini No-Bake Oreo Cheesecakes Recipe tasting fresh and maintaining the perfect texture, store them in an airtight container in the fridge. They’re best enjoyed within 2 days of making. Keeping them chilled until serving ensures they stay firm and delicious.
Freezing
If you want to prepare ahead or save some for later, freezing works great. After assembling, freeze the cheesecakes for 4 hours or until firm, as the recipe suggests. You can keep them frozen wrapped tightly in plastic wrap or in an airtight container for up to 1 month. When ready to enjoy, thaw gently in the fridge for a few hours before serving.
Reheating
No reheating is necessary or recommended with these cheesecakes since they’re best served chilled. Just allow any frozen cheesecakes to thaw fully in the fridge to enjoy the perfect creamy texture every time.
Frequently Asked Questions:
Yes, regular Oreos are naturally vegan as they don't contain dairy, making them perfect for this Mini No-Bake Oreo Cheesecakes Recipe.
No worries! You can use a resealable plastic bag and snip off a small corner to pipe the filling and whipped cream. It might not be as precise but works just fine.
Absolutely. I recommend brands like Violife Original Cream Cheese or Sainsbury’s Own Free From Soft Cream Cheese for the best texture and flavor.
They are best eaten within 2 days when stored in the fridge to enjoy optimal flavor and texture.
Final Thoughts
These Mini No-Bake Oreo Cheesecakes Recipe have quickly become one of my favorite go-to treats — they’re incredibly simple, impressively delicious, and vegan-friendly to boot! Whether you're treating yourself after a long day or hosting a gathering, these little cheesecakes deliver creamy, crunchy joy in every bite. I hope you love making and sharing them as much as I do. Enjoy every chilled, chocolatey mouthful!
Print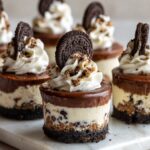
Mini No-Bake Oreo Cheesecakes Recipe
- Prep Time: 20 minutes
- Freezing Time: 4 hours
- Cook Time: 0 minutes
- Total Time: 4 hours 20 minutes
- Yield: 6 servings 1x
- Category: Dessert
- Method: No-Cook
- Cuisine: American
- Diet: Vegan
Description
These Mini No-Bake Oreo Cheesecakes are a delightful vegan treat featuring a crunchy Oreo base topped with a creamy, dairy-free cheesecake filling. Perfect for parties or a sweet snack, they set in the freezer and require no baking.
Ingredients
Base Ingredients
- 150 g Oreo Cookies
- 50 g dairy-free butter or margarine
Cheesecake Filling Ingredients
- 260 g dairy-free whipping cream (1 pot of Elmlea Plant Based Alternative Double cream)
- 160 g dairy-free cream cheese (e.g., Violife Original Cream Cheese or Sainsbury's Own Free From Soft Cream Cheese)
- 8 Oreo Cookies
Whipped Cream Topping
- 20 g dairy-free whipping cream
- 4 Oreo Cookies
Instructions
- Prepare the base: Melt the dairy-free butter or margarine gently over low heat in a small saucepan. Remove from heat and pour into a heatproof mixing bowl. Blend the Oreo cookies in a food processor until fine crumbs form. Mix the crumbs thoroughly into the melted butter until the mixture resembles wet sand and holds shape when pressed. Firmly press this mixture into each compartment of a cookie cup tin using clean hands. Freeze while preparing the filling.
- Make the cheesecake filling: In a medium bowl, add the dairy-free whipping cream and dairy-free cream cheese. Whip first on low speed to avoid splashing then increase to high speed until thick and creamy, about 5 minutes, using a stand mixer or hand whisk. Blend the 8 Oreo cookies finely and fold into the whipped cream mixture, mixing thoroughly.
- Fill the cookie cups: Transfer cheesecake filling into a piping bag with a large round tip or snip the end of a piping bag. Pipe evenly into each prepared cookie cup, leveling off the tops with an offset spatula. Freeze for 4 hours or until firm.
- Prepare the whipped cream topping: Whip 20 g of dairy-free whipping cream in a bowl on high speed until thick using a stand mixer or balloon whisk. Transfer the cream to a piping bag fitted with an open star tip nozzle.
- Decorate and serve: Once the cheesecakes are firm, gently remove them from the tins by pushing up the bases. Pipe a swirl of whipped cream on each cheesecake, then decorate with half an Oreo cookie and some cookie crumbles. Serve chilled and enjoy.
Notes
- Store these mini cheesecakes in the fridge and consume within 2 days for the best taste and texture.
- The more compact the base mixture is pressed, the less likely it is to crumble.
- Use a piping bag for neat and even distribution of the cheesecake filling and whipped cream topping.
- Recommended dairy-free cream cheeses include Violife Original Cream Cheese and Sainsbury's Own Free From Soft Cream Cheese, both vegan friendly.
- If cheesecakes are not fully firm after freezing, they may be difficult to remove cleanly from the tins.
Nutrition
- Serving Size: 1 mini cheesecake (approx. 90 g)
- Calories: 280 kcal
- Sugar: 20 g
- Sodium: 120 mg
- Fat: 18 g
- Saturated Fat: 8 g
- Unsaturated Fat: 8 g
- Trans Fat: 0 g
- Carbohydrates: 26 g
- Fiber: 1 g
- Protein: 3 g
- Cholesterol: 0 mg


Leave a Reply