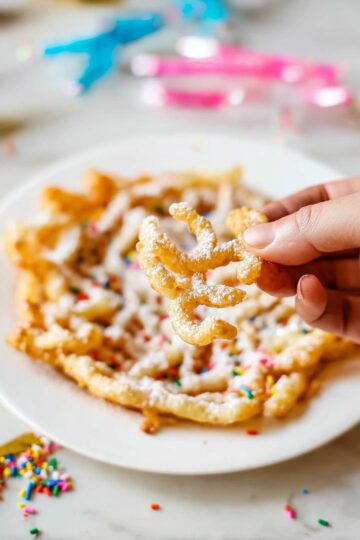
If you’re looking for a sweet treat that’s easy, crunchy, and downright addictive, you’ve come to the right place. This Butterfinger Chocolate Coated Balls Recipe combines creamy peanut butter, crispy graham cracker crumbs, and those iconic Butterfinger pieces—all wrapped in smooth chocolate. Perfect for when you want a festive snack without all the fuss.

Jump to:
- Why You'll Love This Recipe
- Ingredients & Why They Work
- Make It Your Way
- Step-by-Step: How I Make Butterfinger Chocolate Coated Balls Recipe
- Top Tip
- How to Serve Butterfinger Chocolate Coated Balls Recipe
- Make Ahead and Storage
- Frequently Asked Questions:
- Final Thoughts
- Butterfinger Chocolate Coated Balls Recipe
Why You'll Love This Recipe
Honestly, I can’t get enough of these Butterfinger Balls. They’re one of those recipes I find myself reaching for over and over, whether it’s a last-minute party or a cozy night in with a movie. The combination of textures and flavors is just spot-on!
- Super simple prep: No-bake and done in under an hour including freezing time.
- The perfect balance: Creamy peanut butter meets crunchy Butterfinger candy and graham crackers.
- Customizable coating: Dip fully or halfway, then add sprinkles, salt, or extra crushed candy.
- Make ahead friendly: Freeze and store for whenever a sweet craving hits.
Ingredients & Why They Work
Before you start, here’s a quick rundown of the ingredients I use and why. Picking the right components makes these no-bake Butterfinger Chocolate Coated Balls just perfect every time.

- Butter: Softened for smooth mixing and rich creaminess.
- Vanilla extract: Adds a warm, subtle sweetness that enhances the peanut butter flavor.
- Peanut butter: I recommend classic creamy kinds like Jif or Skippy to avoid separation and get that perfect texture.
- Powdered sugar: Sweetens and firms up the ball mixture for easier shaping.
- Graham cracker crumbs: Bring a lovely crunch and slightly nutty flavor to the mix.
- Crushed Butterfinger bars: The star of the show—providing that iconic crispy, peanut buttery crunch in every bite.
- Chocolate bark or chips: For dipping, I like to use milk or dark chocolate depending on preference, melted gently to the perfect coating consistency.
- Optional toppings: Extra crushed Butterfinger, festive sprinkles, or a sprinkle of coarse sea salt to add dimension and flair.
Make It Your Way
The fun part about the Butterfinger Chocolate Coated Balls Recipe is just how easy it is to tweak and make it your own. Whether you want to switch up the coatings or add a little extra flair, these no-bake treats are incredibly forgiving and adaptable!
- Peanut Butter Swap: I’ve found using classic peanut butter like Jif or Skippy gives the best creamy texture. Tried natural peanut butter once, but it made the mixture a bit oily and harder to shape.
- Chocolate Choice: For a richer twist, I switched to dark chocolate chips, which made the coating smoother and gave a bittersweet balance to the sweet centers – perfect if you prefer your desserts less sweet.
- Half Dip Magic: Sometimes I only dip the balls halfway in chocolate, which looks really pretty and adds a fun two-tone effect. Plus, you can drizzle some melted chocolate on top for an extra chocolatey pop!
- Festive Flair: Around the holidays, I sprinkle colorful festive sprinkles or a pinch of coarse sea salt right after dipping for a perfect sweet-salty flavor and some eye-catching texture.
- Make Ahead & Freeze: These balls freeze wonderfully, so I often make a big batch and keep them in the freezer for spontaneous sweet snacking or last-minute guests.
Step-by-Step: How I Make Butterfinger Chocolate Coated Balls Recipe

Step 1: Creaming the Base to Perfection
Start by softening your butter and adding it to a large mixing bowl with one cup of peanut butter. Using your hand or stand mixer, beat them together until you get a smooth, creamy consistency. This usually takes about 2 to 3 minutes. Then, pour in a teaspoon of vanilla extract for that lovely aromatic boost and mix it all until just combined. You’ll know you’re ready for the next step when the mixture is silky and evenly blended.
Step 2: Folding in Sweetness and Crunch
Next, reduce your mixer speed and gradually add one cup of powdered sugar. Keep the mixer slow so you don’t end up with a floury cloud of sugar everywhere — and scrape the bowl’s sides as you go to ensure everything comes together nicely. Once the sugar is almost fully mixed in, gently fold in ¾ cup of graham cracker crumbs and half a cup of crushed Butterfinger bars. This is where the magic happens: the mixture becomes thick enough to shape and rewards you with that wonderful, irresistible buttery crunch.
Step 3: Rolling Into Perfect Little Balls
Line a baking sheet with parchment paper before scooping the mixture. Using about 1 to 1½ tablespoons for each, roll the dough between your palms into smooth, round balls. Place each one spaced evenly on the baking sheet. Don’t worry if a few aren’t exactly perfect—rustic shapes just add charm! Once all balls are formed, pop the tray into the freezer for 30 minutes. This chilling step is crucial because it firms up the balls for easy dipping later on.
Step 4: Melting Chocolate with Care
While your balls are chilling, melt 8 ounces of chocolate bark or chocolate chips in a microwave-safe bowl. Heat in 30-second bursts at 50% power, stirring well between each to keep the chocolate smooth and glossy. Be very careful not to overheat—burnt chocolate can taste bitter and clumpy. The ideal texture is velvety and fluid, perfect for coating your chilled treats.
Step 5: Dipping and Decorating Delight
Take the firm balls out of the freezer and dip each one into the melted chocolate. You can either cover them completely or just dip halfway for that pretty two-tone look. Quickly sprinkle extra crushed Butterfinger pieces, coarse sea salt, or festive sprinkles onto the chocolate before it has a chance to set. This is your moment to get creative and make these treats uniquely yours.
Step 6: Letting Them Set and Enjoy!
Place the dipped balls back on the parchment-lined sheet and let the chocolate harden completely. This usually takes about 20 minutes at room temperature, or you can speed it up by putting them back in the refrigerator for 10-15 minutes. Once set, your Butterfinger Chocolate Coated Balls are ready to serve or store. They keep well in an airtight container for up to a week and freeze beautifully for future indulgence.
Top Tip
Making the perfect Butterfinger Chocolate Coated Balls Recipe can be so rewarding, especially when you have a few handy tips up your sleeve to ensure they come out just right every time.
- Choosing the Right Peanut Butter: I always recommend using classic peanut butter like Jif or Skippy rather than natural ones. The creamy consistency keeps the balls smooth and helps them hold together without getting oily.
- Chocolate Melting Method: Melting chocolate slowly at 50% power in 30-second intervals really saves you from burning it. Stirring between intervals ensures you get a silky coating perfect for dipping.
- Freezing Time: Don’t skip the freezing step! Freezing for a full 30 minutes firms up the balls nicely, making the dipping process easier and less messy.
- Decoration Timing: Adding sprinkles, crushed Butterfinger bits, or sea salt just as you dip ensures they stick perfectly to the glossy chocolate before it sets. I tried adding toppings too late once and the chocolate hardened first – lesson learned!
How to Serve Butterfinger Chocolate Coated Balls Recipe

Garnishes
Garnishing your Butterfinger Chocolate Coated Balls is half the fun! Sprinkle extra crushed Butterfingers on top for an irresistible crunch, add festive sprinkles to brighten up holiday gatherings, or finish with a pinch of coarse sea salt to enhance the chocolate and peanut butter flavors. For a more elegant touch, try a light drizzle of white or dark chocolate over the set coating.
Side Dishes
These no-bake balls shine best as a standalone treat but pair wonderfully with a few simple sides. Serve alongside fresh fruit like sliced strawberries or apple wedges to balance out the richness. A cold glass of milk or a cup of coffee complements the chocolate and peanut butter perfectly, making these balls a delightful afternoon snack or party dessert.
Make Ahead and Storage
Storing Leftovers
Once your Butterfinger Chocolate Coated Balls are fully set, store them in an airtight container in the refrigerator. They’ll keep fresh and chewy for up to one week—perfect for enjoying throughout the week or during a gathering.
Freezing
These treats freeze beautifully! Place the fully coated balls on parchment-lined trays and freeze until solid, then transfer to a freezer-safe container or zip-top bag. They’ll keep for up to 3 months. When ready to enjoy, thaw them in the fridge for a few hours to maintain their texture and flavor.
Reheating
Since these are no-bake and served chilled, reheating isn’t necessary. If you prefer a softer texture, just let them sit at room temperature for 10–15 minutes before serving. Avoid microwaving as this can melt the chocolate coating and change the texture.
Frequently Asked Questions:
Natural peanut butter tends to separate and can make the mixture oily and harder to form into balls. It’s best to use a creamy commercial peanut butter like Jif or Skippy for the best texture and consistency.
Milk chocolate bark or chips work wonderfully for a sweet, creamy coating. For a richer flavor, dark chocolate chips or bark are an excellent choice. Just be sure to melt the chocolate gently to prevent scorching.
Chilling the balls thoroughly before dipping and letting the coated balls set completely in a cool place or refrigerator helps the chocolate harden and keeps them from melting too quickly at room temperature.
Absolutely! These balls freeze well and can be made weeks in advance. Keep them in the freezer wrapped tightly, then thaw in the fridge before serving for the freshest texture and flavor.
Final Thoughts
These Butterfinger Chocolate Coated Balls bring together the perfect balance of creamy peanut butter, crunchy Butterfinger chunks, and luscious chocolate – all without turning on the oven. Whether you’re whipping them up for a holiday party, a sweet snack, or a simple treat to enjoy with loved ones, they’re always a crowd pleaser. I hope these tips and ideas help you create batches that delight your taste buds and bring a little extra joy to your day!
Print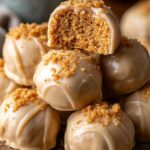
Butterfinger Chocolate Coated Balls Recipe
- Prep Time: 20 minutes
- Freezing Time: 30 minutes
- Cook Time: 0 minutes
- Total Time: 50 minutes
- Yield: 24 balls 1x
- Category: Dessert
- Method: No-Cook
- Cuisine: American
Description
Butterfinger Balls are a quick and easy no-bake treat combining creamy peanut butter, sweet powdered sugar, crunchy graham cracker crumbs, and chunks of Butterfinger candy, all coated in smooth melted chocolate. Perfect for festive occasions or a delicious snack.
Ingredients
Base Ingredients
- 4 tablespoons butter softened
- 1 teaspoon vanilla extract
- 1 cup peanut butter (avoid all-natural varieties that separate)
Mix-ins
- 1 cup powdered sugar
- ¾ cup graham cracker crumbs
- ½ cup crushed Butterfinger bars
Coating and Decoration
- 8 ounces chocolate bark or chocolate chips for coating
- Optional: extra crushed Butterfinger bars
- Optional: festive sprinkles
- Optional: coarse sea salt for topping
Instructions
- Mix the Base: In a large bowl, use a hand or stand mixer to cream together the peanut butter and softened butter until smooth. Add vanilla extract and mix until combined.
- Add Sweetness and Crunch: Gradually mix in the powdered sugar at low speed, scraping the sides of the bowl as needed. Fold in graham cracker crumbs and crushed Butterfingers until the mixture is evenly combined.
- Form the Balls: Line a baking sheet with parchment paper. Scoop about 1 to 1½ tablespoons of the dough and roll into balls. Place them spaced apart on the sheet.
- Chill to Set: Freeze the formed balls for 30 minutes or until completely firm.
- Melt the Chocolate: In a microwave-safe bowl, melt the chocolate bark or chips in 30-second intervals at 50% power, stirring between bursts until smooth. Be careful not to overheat.
- Dip and Decorate: Dip each chilled ball in the melted chocolate—either fully or halfway. Immediately top with additional crushed Butterfingers, sea salt, or sprinkles before the chocolate sets.
- Let Them Set: Allow the chocolate coating to harden completely before serving or storing.
Notes
- Use regular peanut butter (like Jif or Skippy) for best consistency.
- For a deeper chocolate flavor, use dark chocolate chips or bark.
- These freeze beautifully—great for make-ahead treats during holidays or special occasions.
- Try dipping only halfway for a two-tone look or drizzle extra chocolate over the tops once set.
Nutrition
- Serving Size: 1 ball
- Calories: 140 kcal
- Sugar: 11 g
- Sodium: 55 mg
- Fat: 9 g
- Saturated Fat: 4 g
- Unsaturated Fat: 5 g
- Trans Fat: 0 g
- Carbohydrates: 12 g
- Fiber: 1 g
- Protein: 3 g
- Cholesterol: 15 mg

Leave a Reply