There's something simply irresistible about warm, soft rolls with a subtle touch of honey, straight from the oven. This Honey Yeast Rolls Recipe is my go-to whenever I want to wow guests or enjoy a comforting homemade treat. They’re fluffy, lightly sweetened, and perfect for any meal or snack time.

Jump to:
Why You'll Love This Recipe
I’ve tried my share of yeast roll recipes, but this honey yeast roll recipe quickly became a favorite because it hits that perfect balance of sweetness and softness. It’s homey but special, and it’s not as complicated as you might think.
- Soft & Fluffy Texture: Thanks to the honey and butter, these rolls have a tender crumb that feels like a hug in bread form.
- Simple Ingredients: You probably already have everything in your pantry, so it’s a no-stress bake any time.
- Easy to Shape:** The dough is forgiving and makes shaping rolls doable for beginners without sticky messes.
- That Perfect Honey Butter Finish: Brushing the tops with honey-infused butter adds a shiny, sweet glaze that’s pure magic.

Ingredients & Why They Work
Each ingredient plays its part in making these rolls a home run. The warm milk creates the perfect environment for the yeast to bloom, while honey acts as both a sweetener and a tenderizer. Butter adds richness and softness, and salt balances the flavors beautifully. Here are some tips on each ingredient so you’ll feel confident picking them out.

- Warm Milk: Aim for 110-115°F to activate the yeast without killing it—too hot and the yeast won’t work!
- Granulated Sugar: Just a touch here to feed the yeast and kickstart the rising process.
- Active Dry Yeast: The magic behind the rise. Make sure it’s fresh and proofed properly—you’ll see it foam up before mixing.
- Honey: Adds gentle sweetness and keeps the rolls moist; plus, that natural floral flavor makes a difference.
- Salt: Essential for bringing depth to the dough—it keeps the sweetness from going overboard.
- Egg: Helps bind the dough and adds richness for a tender crumb.
- All-Purpose Flour: The bread’s structure—measure carefully and avoid adding too much to keep rolls light.
- Unsalted Butter: Cubed into the dough for richness, plus melted butter brushed on top for that golden shine.
Make It Your Way
This honey yeast rolls recipe is incredibly flexible. I love adding my own twists depending on the occasion. Play with the flavors or shape to make these rolls truly yours.
- Variation: Sometimes I sprinkle a bit of cinnamon sugar on top right before baking for a warm, cozy twist that’s perfect for breakfast.
- Dietary Modifications: Using half whole wheat flour can add a nutty flavor and boost fiber, but be mindful it changes texture a bit.
- Difficulty Level: Even if you haven’t worked with yeast dough before, the clear rise times and simple kneading steps make this recipe a great beginner one.
Step-by-Step: How I Make Honey Yeast Rolls Recipe
Step 1: Bloom the Yeast
Start by warming your milk to around 110-115°F – warm enough to activate the yeast without harming it. Pour it into your mixer bowl, sprinkle the sugar and yeast on top, then whisk gently. This is when the magic begins—wait about 5-10 minutes until the mixture becomes foamy or bubbly, which means your yeast is happily alive and ready.
Step 2: Build the Dough
Add the honey, salt, and egg to your yeast mixture and mix gently to combine. Then add the flour, starting to mix on low speed until it’s mostly combined. Toss in those butter cubes next—they’ll enrich the dough beautifully. Switch to your dough hook and knead on low speed for about 8 minutes until your dough is smooth but still slightly sticky. Don’t panic if it's a bit tacky; that’s what makes the rolls soft!
Step 3: First Rise
Transfer your dough to a large lightly oiled bowl, turn it over to coat all sides, then cover it with a kitchen towel or plastic wrap. Let it sit in a warm spot for about an hour, until doubled in size. This slow rise is when flavor and texture develop, so be patient!
Step 4: Shape Your Rolls
Grease a 13×9 inch baking dish. Turn your dough out onto a lightly floured surface, knead a few times, then divide into 24 equal pieces. I like to cut it into thirds first, then halve and halve again until each section is about the same size. Roll each piece into a ball and place them close, but not squished, in your pan for that perfect pull-apart effect.
Step 5: Second Rise & Bake
Cover your rolls and let them rise again for about 30 minutes. Meanwhile, preheat your oven to 400°F. Once puffed up, bake them for 16-20 minutes until golden and smelling amazing. Usually around 17 minutes works perfect in my oven.
Step 6: The Finishing Touch
Right after they come out of the oven, whisk melted butter with honey and brush this heavenly glaze over the tops. This step seals in moisture and adds that signature honey-sweet finish that makes these rolls unforgettable.
Top Tip
Having baked these rolls numerous times, I’ve learned these tips really help keep the process smooth and boost your success rate. Trust me, the difference is real!
- Milk Temperature: Use a thermometer to get it right – too hot kills the yeast, too cold slows the rise drastically.
- Don’t Overflour the Dough: As tempting as it might be, adding too much flour makes rolls dense. Keep them slightly sticky but workable.
- Kneading Time: Knead just enough for a smooth dough. Overkneading can develop too much gluten and lead to tougher rolls.
- Warm Rising Spot: Find a cozy spot in your kitchen, like near a warm oven or inside your microwave with a cup of hot water, to speed up rising.
How to Serve Honey Yeast Rolls Recipe

Garnishes
I usually keep it simple with just the honey butter glaze, but when I want to get fancy, a sprinkle of flaky sea salt or a dash of cinnamon sugar before baking adds a lovely twist. Fresh herbs like rosemary or thyme can also be pressed lightly on top before baking for an herby touch.
Side Dishes
These rolls shine alongside hearty soups like butternut squash or chicken noodle. I also love serving them with roasted veggies or a big family-style salad for a well-rounded meal. They’re perfect as dinner rolls or for breakfast with a dab of jam and butter.
Creative Ways to Present
For holidays, I arrange these rolls in a wreath shape on a baking sheet before the second rise. After baking and glazing, it makes a stunning centerpiece that everyone loves to pull apart. You can also stuff them with a bit of cheese or garlic butter right before shaping for savory stuffed rolls.
Make Ahead and Storage
Storing Leftovers
I store any leftover rolls in an airtight container at room temperature. They usually stay soft and delicious for about 2 days. If your kitchen is warm or humid, I recommend wrapping them tightly in plastic wrap or storing them in a zip-top bag to lock in moisture.
Freezing
These rolls freeze beautifully. I like to freeze them individually on a baking sheet first, then transfer to a freezer bag. When warmed, they taste freshly baked. Just thaw overnight in the fridge or at room temp and warm in the oven wrapped in foil.
Reheating
To warm rolls, I preheat the oven to 350°F and wrap them in foil to keep them moist, heating about 10 minutes. A quick brush of melted butter after reheating revives that fresh-baked flavor and softness.
Frequently Asked Questions:
Absolutely! If you use instant yeast, you can skip the blooming step and mix it directly with the flour. You might find the rise time slightly faster, so keep an eye on your dough during the proofing stages.
If your dough feels very sticky, sprinkle just a tablespoon of flour at a time and knead it in. Avoid adding too much flour because it will make the rolls dense and dry. Slight stickiness is good—it helps keep rolls soft.
The rolls should be a lovely golden brown on top, and when tapped, they feel light and springy. If you have a kitchen thermometer, an internal temperature of around 190°F indicates they’re done.
Yes! You can mix and shape the rolls, then refrigerate them overnight for the second rise. Just bring them to room temperature before baking. This method can help deepen flavors and save time the next day.
Final Thoughts
This Honey Yeast Rolls Recipe really holds a special place in my kitchen rotation. They’re the kind of homemade bread that’s approachable but feels genuinely special—and honestly, there’s nothing like breaking into a warm, buttery, honey-glazed roll with family or friends. I hope you enjoy making and sharing these as much as I do!
Print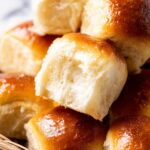
Honey Yeast Rolls Recipe
- Prep Time: 30 minutes
- Cook Time: 20 minutes
- Total Time: 1 hour 50 minutes
- Yield: 24 rolls 1x
- Category: Bread
- Method: Baking
- Cuisine: American
- Diet: Vegetarian
Description
These Honey Yeast Rolls are soft, fluffy, and lightly sweetened with honey. Perfect as a comforting side or for any occasion, they're brushed with a delicious honey butter glaze after baking for a lovely golden finish.
Ingredients
Dough
- 1 ¼ cups warm milk (110-115° F)
- 1 tablespoon granulated sugar
- 2 ¼ teaspoons active dry yeast (or one packet)
- 2 tablespoons honey
- 1 ¼ teaspoons salt
- 1 large egg (at room temperature)
- 3 ¾ cups all-purpose flour (plus more as needed)
- 4 tablespoons unsalted butter (at room temperature, cut into cubes)
Honey Butter Glaze
- 1 ½ tablespoons melted butter
- 1 ½ tablespoons honey
Instructions
- Activate Yeast: Place the warm milk in the bowl of a stand mixer. Add the granulated sugar and sprinkle the yeast over the milk. Whisk gently to combine. Let the mixture sit for 10 minutes until the yeast starts to foam and bubble.
- Combine Ingredients: Add the honey, salt, and egg to the yeast mixture and mix gently to combine.
- Add Flour and Butter: Add the 3 ¾ cups of flour. Use the paddle attachment to mix on low speed until mostly incorporated. Add the butter cubes and continue mixing on low speed until the butter is incorporated.
- Knead Dough: Switch to the dough hook and knead on low speed for about 8 minutes, until the dough is smooth and slightly sticky. If very sticky, add flour 1 tablespoon at a time, avoiding excess to keep rolls light.
- First Rise: Transfer dough to a lightly oiled large bowl, turn to coat, cover with a towel or plastic wrap, and let rise in a warm place for 1 hour until doubled in size.
- Prepare Baking Dish: Grease a 13x9-inch rectangular baking dish with cooking spray or butter.
- Shape Rolls: Transfer dough to a lightly floured surface and knead a few times. Cut dough into 24 equal pieces by dividing into thirds, then each third into eighths. Shape each piece into a ball and place in the baking dish.
- Second Rise: Cover the rolls and let them rise for 30 minutes.
- Preheat Oven: Preheat oven to 400 degrees F.
- Bake Rolls: Uncover and bake the rolls for 20 minutes until golden brown and cooked through.
- Glaze Rolls: Remove from oven. Whisk together melted butter and honey, then brush over the warm rolls. Serve immediately.
Notes
- Use warm milk between 110-115° F to activate yeast properly.
- Do not add too much flour; dough should remain slightly sticky for light, fluffy rolls.
- Allow rolls to rise in a warm, draft-free environment for best results.
- Brushing rolls with honey butter while warm gives them a beautiful shine and extra flavor.
- These yeast rolls freeze well; thaw and warm before serving.
Nutrition
- Serving Size: 1 roll
- Calories: 120 kcal
- Sugar: 4 g
- Sodium: 137 mg
- Fat: 3 g
- Saturated Fat: 2 g
- Unsaturated Fat: 1 g
- Trans Fat: 0 g
- Carbohydrates: 19 g
- Fiber: 1 g
- Protein: 3 g
- Cholesterol: 15 mg


Leave a Reply